全部的 K8S学习笔记总目录 ,请点击查看。
k8s 服务发现主要使用的是 CoreDNS,服务访问则需要借助于 Ingress,接下来我们来看看这两个组件。
服务发现 服务发现测试 在k8s集群中,组件之间可以通过定义的Service名称实现通信。
1 2 3 4 5 6 7 8 9 10 11 12 13 14 15 16 17 18 19 20 21 22 23 24 25 26 27 28 29 30 31 32 33 34 35 36 37 38 39 40 $ kubectl -n test get svc NAME TYPE CLUSTER-IP EXTERNAL-IP PORT(S) AGE myblog ClusterIP 10.104.58.9 <none> 80/TCP 12d myblog-np NodePort 10.98.222.213 <none> 80:31174/TCP 11d mysql ClusterIP 10.110.89.44 <none> 3306/TCP 11d cat > testpod.yaml <<EOF apiVersion: apps/v1 kind: Deployment metadata: name: testpod namespace: test spec: replicas: 1 selector: matchLabels: app: testpod template: metadata: labels: app: testpod spec: containers: - name: testpod image: alpine:3.18.3 imagePullPolicy: IfNotPresent command: ["/bin/sh"] args: ["-c", "while true; do echo hello; sleep 100;done"] EOF $ kubectl -n test create -f testpod.yaml $ kubectl -n test exec -ti testpod-865855cfc5-m2f99 -- sh / / /
可以发现,服务是可以直接通过service名称访问的。
虽然pod ip和cluster ip都不固定,但是service name是固定的,而且具有完全的跨集群可移植性,因此组件之间调用的同时,完全可以通过service name去通信,这样避免了大量的ip维护成本,使得服务的yaml模板更加简单。因此可以对mysql和myblog的部署进行优化改造。
blog 优化改造
mysql可以去掉hostNetwork部署,使得服务只暴漏在k8s集群内部网络
configMap中数据库地址可以换成Service名称,这样跨环境的时候,配置内容基本上可以保持不用变化
修改deploy-mysql.yaml,去掉hostNetwork和hostPort
1
2
3
4
5
6
7
8
9
10
11
12
13
14
15
16
17
18
19
20
21
22
23
24
25
26
27
28
29
30
31
32
33
34
35
36
37
38
39
40
41
42
43
44
45
46
47
48
49
50
51
52
53
54
apiVersion: apps/v1 kind: Deployment metadata: name: mysql namespace: test spec: replicas: 1 selector: matchLabels: app: mysql template: metadata: labels: app: mysql spec: volumes: - name: mysql-data hostPath: path: /opt/mysql/data nodeSelector: component: mysql containers: - name: mysql image: mariadb:11.1 args: - --character-set-server=utf8mb4 - --collation-server=utf8mb4_unicode_ci ports: - containerPort: 3306 env: - name: MYSQL_USER valueFrom: secretKeyRef: name: myblog-secret key: MYSQL_USER - name: MYSQL_ROOT_PASSWORD valueFrom: secretKeyRef: name: myblog-secret key: MYSQL_PASSWD - name: MYSQL_DATABASE valueFrom: configMapKeyRef: name: myblog key: MYSQL_DATABASE volumeMounts: - name: mysql-data mountPath: /var/lib/mysql
修改configmap.yaml
1
2
3
4
5
6
7
8
9
10
apiVersion: v1 kind: ConfigMap metadata: name: myblog namespace: test data: MYSQL_HOST: "mysql" MYSQL_DATABASE: "myblog" MYSQL_PORT: "3306"
应用修改:
1 2 3 4 5 6 7 $ kubectl -n test delete -f configmap.yaml $ kubectl -n test create -f configmap.yaml $ kubeclt -n test delete -f deploy-mysql.yaml $ kubeclt -n test create -f deploy-mysql.yaml
服务发现组件 在k8s中,服务发现组件使用的是 CoreDNS,组件之间可以通过定义的Service名称实现通信。组件效率非常高,可以达到每秒几万次的解析速度,并且对应用没有任何侵入性,对应用来说,只需要通过service name就可以实现服务发现。
CoreDNS是一个Go语言实现的链式插件DNS服务端,是CNCF成员,是一个高性能、易扩展的DNS服务端。
1 2 3 4 5 6 7 8 9 10 11 12 13 14 15 16 17 18 19 20 21 22 23 24 25 26 27 28 29 30 31 32 33 34 35 36 37 38 39 40 41 $ kubectl -n test exec -it testpod-865855cfc5-m2f99 -- sh / search test.svc.cluster.local svc.cluster.local cluster.local iluvatar.local nameserver 10.96.0.10 options ndots:5 / $ kubectl -n kube-system get svc -A NAMESPACE NAME TYPE CLUSTER-IP EXTERNAL-IP PORT(S) AGE default kubernetes ClusterIP 10.96.0.1 <none> 443/TCP 24d kube-system kube-dns ClusterIP 10.96.0.10 <none> 53/UDP,53/TCP,9153/TCP 24d test myblog ClusterIP 10.104.58.9 <none> 80/TCP 12dtest myblog-np NodePort 10.98.222.213 <none> 80:31174/TCP 11dtest mysql ClusterIP 10.110.89.44 <none> 3306/TCP 11d$ kubectl -n kube-system get svc -o wide NAME TYPE CLUSTER-IP EXTERNAL-IP PORT(S) AGE SELECTOR kube-dns ClusterIP 10.96.0.10 <none> 53/UDP,53/TCP,9153/TCP 24d k8s-app=kube-dns $ kubectl -n kube-system get po -o wide -l k8s-app=kube-dns NAME READY STATUS RESTARTS AGE IP NODE NOMINATED NODE READINESS GATES coredns-66f779496c-cx2zv 1/1 Running 0 24d 10.244.1.2 k8s-node1 <none> <none> coredns-66f779496c-t5zs2 1/1 Running 0 24d 10.244.1.3 k8s-node1 <none> <none> service_name.namespace $ kubectl get svc NAME TYPE CLUSTER-IP EXTERNAL-IP PORT(S) AGE kubernetes ClusterIP 10.96.0.1 <none> 443/TCP 26h
扩展:怎么访问其他集群的服务? 1 2 3 4 5 6 7 8 9 10 11 12 13 14 15 16 17 18 19 20 21 22 23 24 25 26 27 28 29 30 31 32 33 34 35 36 37 38 39 40 41 42 43 44 45 46 47 48 49 50 51 52 53 54 55 56 57 58 59 60 61 62 63 64 65 66 67 68 69 70 71 72 73 74 75 76 77 $ cat > deploy-mynginx.yaml <<EOF apiVersion: apps/v1 kind: Deployment metadata: name: nginx spec: replicas: 1 selector: matchLabels: app: nginx template: metadata: labels: app: nginx spec: containers: - name: nginx image: nginx:1.25 imagePullPolicy: IfNotPresent ports: - containerPort: 80 --- apiVersion: v1 kind: Service metadata: name: nginx spec: ports: - port: 80 protocol: TCP targetPort: 80 selector: app: nginx type: ClusterIP EOF $ kubectl create -f deploy-mynginx.yaml $ kubectl get po NAME READY STATUS RESTARTS AGE nginx-cd5968d5b-66mns 1/1 Running 0 25s $ kubectl get svc NAME TYPE CLUSTER-IP EXTERNAL-IP PORT(S) AGE kubernetes ClusterIP 10.96.0.1 <none> 443/TCP 24d nginx ClusterIP 10.105.117.66 <none> 80/TCP 30s $ curl http://10.105.117.66 <!DOCTYPE html> <html> <head > <title>Welcome to nginx!</title> <style> html { color-scheme: light dark; } body { width: 35em; margin: 0 auto; font-family: Tahoma, Verdana, Arial, sans-serif; } </style> </head> <body> <h1>Welcome to nginx!</h1> <p>If you see this page, the nginx web server is successfully installed and working. Further configuration is required.</p> <p>For online documentation and support please refer to <a href="http://nginx.org/" >nginx.org</a>.<br/> Commercial support is available at <a href="http://nginx.com/" >nginx.com</a>.</p> <p><em>Thank you for using nginx.</em></p> </body> </html> 进入test po进行访问 $ kubectl -n test exec -it testpod-865855cfc5-m2f99 -- sh / curl: (6) Could not resolve host: nginx
进入容器中访问会发现不行了,这是为什么呢?
这是因为这两个pod不在同一个命名空间,因此需要添加对应的命名空间名称,才能访问到。
之前查看test pod的resolve配置,可以看到有一个search域,这个域名就是test这个命名空间,因此可以直接访问test命名空间下的服务。
test pod中的resolve配置如下:
1 2 3 search test.svc.cluster.local svc.cluster.local cluster.local iluvatar.local nameserver 10.96.0.10 options ndots:5
pod访问的时候会根据search域名进行解析,比如我们访问nginx
首先会尝试访问nginx.test.svc.cluster.local
如果访问不到,会尝试访问nginx.svc.cluster.local
如果访问不到,会尝试访问nginx.cluster.local
如果访问不到,会尝试访问nginx.iluvatar.local
如果访问不到,会尝试访问nginx
如果访问不到,会报错
这是pod访问的时候的解析流程。
为什么能访问到test命名空间下的服务呢?就是因为第一个域名解析成功了,因此后面的域名就不会再解析了。第一个域名包含着命名空间信息。
那我们直接使用全域名能访问吗?
1 2 3 4 5 6 7 8 9 10 11 12 13 14 15 16 17 18 19 20 21 22 23 24 25 26 $ kubectl -n test exec -it testpod-865855cfc5-m2f99 -- sh / <!DOCTYPE html> <html> <head > <title>Welcome to nginx!</title> <style> html { color-scheme: light dark; } body { width: 35em; margin: 0 auto; font-family: Tahoma, Verdana, Arial, sans-serif; } </style> </head> <body> <h1>Welcome to nginx!</h1> <p>If you see this page, the nginx web server is successfully installed and working. Further configuration is required.</p> <p>For online documentation and support please refer to <a href="http://nginx.org/" >nginx.org</a>.<br/> Commercial support is available at <a href="http://nginx.com/" >nginx.com</a>.</p> <p><em>Thank you for using nginx.</em></p> </body> </html>
所以使用全域名也是可以访问的。
那么有没有简便方法直接访问呢?有,就是添加一个namespace就行了,不需要全域名。
1 2 3 4 5 6 7 8 9 10 11 12 13 14 15 16 17 18 19 20 21 22 23 24 25 $ kubectl -n test exec -it testpod-865855cfc5-m2f99 -- sh / <!DOCTYPE html> <html> <head > <title>Welcome to nginx!</title> <style> html { color-scheme: light dark; } body { width: 35em; margin: 0 auto; font-family: Tahoma, Verdana, Arial, sans-serif; } </style> </head> <body> <h1>Welcome to nginx!</h1> <p>If you see this page, the nginx web server is successfully installed and working. Further configuration is required.</p> <p>For online documentation and support please refer to <a href="http://nginx.org/" >nginx.org</a>.<br/> Commercial support is available at <a href="http://nginx.com/" >nginx.com</a>.</p> <p><em>Thank you for using nginx.</em></p> </body> </html>
为什么这样也能访问呢?我们来撸一撸search的过程。
首先会尝试访问nginx.default.test.svc.cluster.local,此时会发现访问不到
然后会尝试访问nginx.default.svc.cluster.local,此时会发现这不就是全域名么,于是就访问成功了。
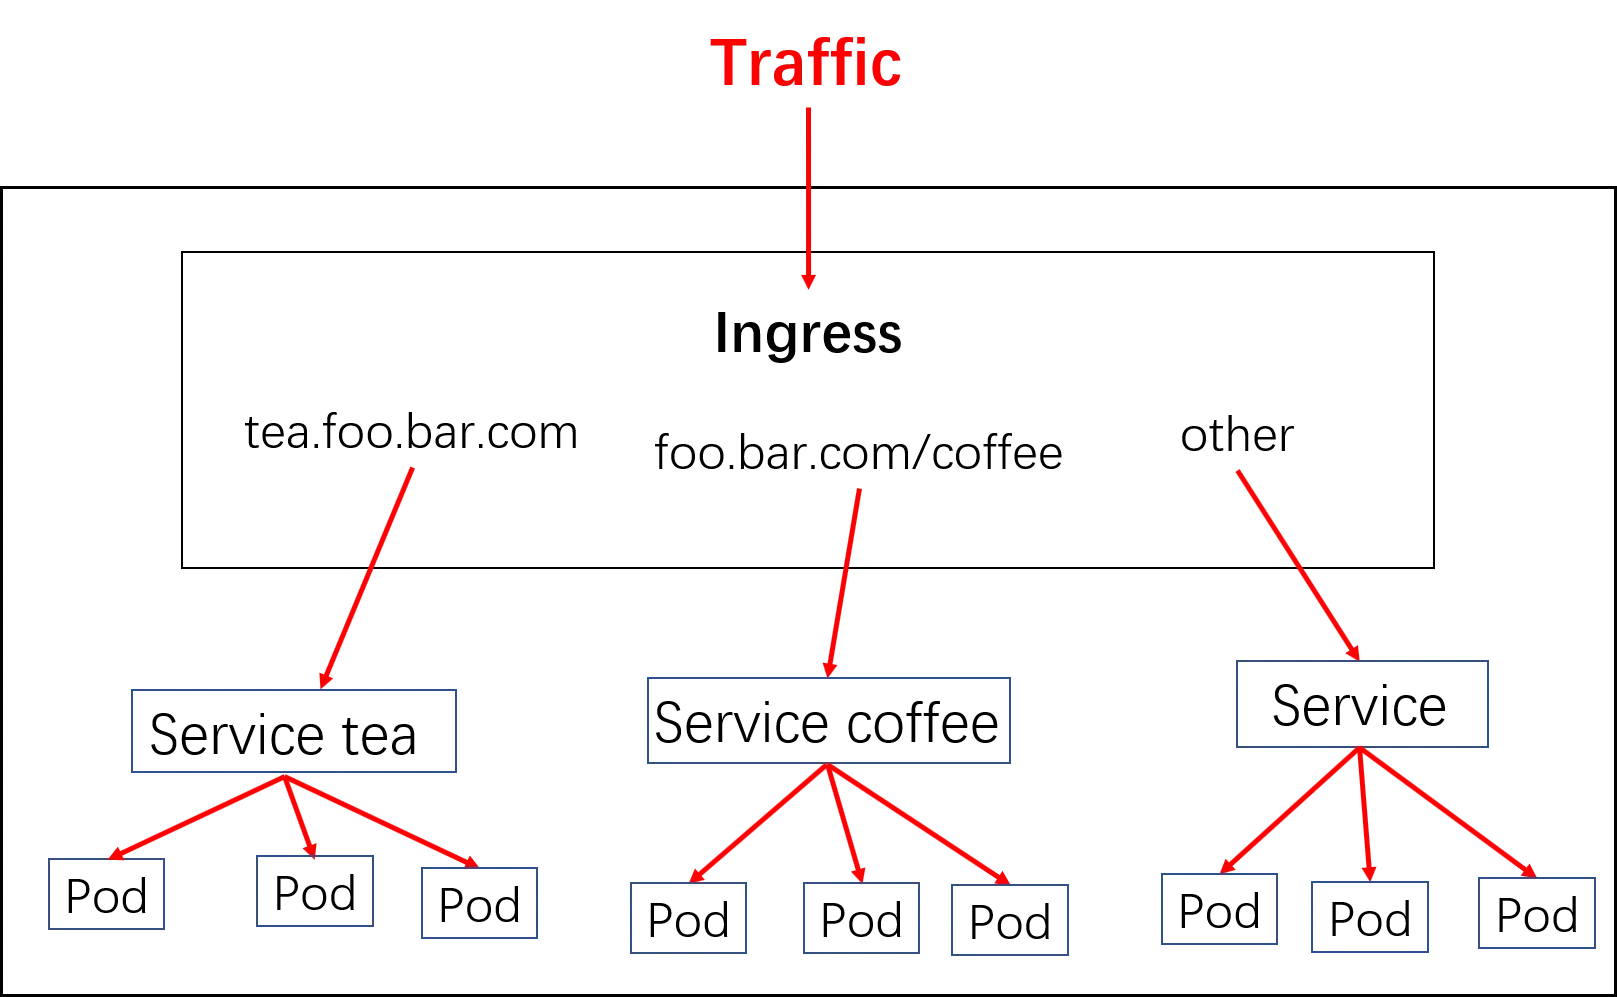
服务访问之Ingress ingress 介绍 对于Kubernetes的Service,无论是Cluster-Ip还是NodePort均是四层的负载,集群内的服务如何实现七层的负载均衡,这就需要借助于Ingress,Ingress控制器的实现方式有很多,比如nginx, Contour, Haproxy, trafik, Istio。几种常用的ingress功能对比和选型可以参考这里
Ingress-nginx是7层的负载均衡器 ,负责统一管理外部对k8s cluster中Service的请求。主要包含:
ingress-nginx-controller:根据用户编写的ingress规则(创建的ingress的yaml文件),动态的去更改nginx服务的配置文件,并且reload重载使其生效(是自动化的,通过lua脚本来实现);
Ingress资源对象:将Nginx的配置抽象成一个Ingress对象
比如下面这种配置:
1 2 3 4 5 6 7 8 9 10 11 12 13 14 15 16 17 18 19 20 21 22 23 24 25 26 apiVersion: networking.k8s.io/v1 kind: Ingress metadata: name: ingress-wildcard-host spec: rules: - host: "foo.bar.com" http: paths: - pathType: Prefix path: "/bar" backend: service: name: service1 port: number: 80 - host: "bar.foo.com" http: paths: - pathType: Prefix path: "/foo" backend: service: name: service2 port: number: 80
对应示意图如下:
实现逻辑
ingress controller通过和kubernetes api交互,动态的去感知集群中ingress规则变化
然后读取ingress规则(规则就是写明了哪个域名对应哪个service),按照自定义的规则,生成一段nginx配置
再写到nginx-ingress-controller的pod里,这个Ingress controller的pod里运行着一个Nginx服务,控制器把生成的nginx配置写入/etc/nginx/nginx.conf文件中
然后reload一下使配置生效。以此达到域名分别配置和动态更新的问题。
ingress安装 官方文档
1 2 3 4 5 6 7 8 9 10 11 12 13 14 15 16 17 18 19 20 21 22 23 24 25 26 27 28 29 30 $ wget https://raw.githubusercontent.com/kubernetes/ingress-nginx/controller-v1.9.4/deploy/static/provider/cloud/deploy.yaml $ vim deploy.yaml apiVersion: apps/v1 kind: Deployment metadata: labels: app.kubernetes.io/component: controller app.kubernetes.io/instance: ingress-nginx app.kubernetes.io/name: ingress-nginx app.kubernetes.io/part-of: ingress-nginx app.kubernetes.io/version: 1.9.4 name: ingress-nginx-controller namespace: ingress-nginx spec: minReadySeconds: 0 ...... dnsPolicy: ClusterFirst nodeSelector: kubernetes.io/os: linux ingress: true hostNetwork: true serviceAccountName: ingress-nginx terminationGracePeriodSeconds: 300 ......
创建ingress
1 2 3 $ kubectl label node k8s-master ingress=true $ kubectl apply -f deploy.yaml
ingress使用 创建资源 编写文件 myblog/deployment/ingress.yaml:
1 2 3 4 5 6 7 8 9 10 11 12 13 14 15 16 17 18 apiVersion: networking.k8s.io/v1 kind: Ingress metadata: name: myblog namespace: test spec: ingressClassName: nginx rules: - host: myblog.test.com http: paths: - path: / pathType: Prefix backend: service: name: myblog port: number: 80
ingress-nginx动态生成upstream配置:
1 2 3 4 5 6 7 8 9 10 11 12 13 14 15 16 17 18 19 20 21 22 23 24 25 26 27 28 29 30 31 32 33 34 35 36 37 38 39 40 41 42 43 44 45 46 47 48 49 50 51 52 53 54 55 56 57 58 59 60 61 62 63 64 65 66 67 68 69 $ kubectl -n ingress-nginx exec -ti ingress-nginx-controller-67f74f8554-scwtp -- sh ... server { server_name myblog.test.com ; listen 80 ; listen [:: ]:80 ; listen 443 ssl http2 ; listen [:: ]:443 ssl http2 ; set $proxy_upstream_name "-" ; ssl_certificate_by_lua_block { certificate.call() } location / { set $namespace "test" ; set $ingress_name "myblog" ; set $service_name "myblog" ; set $service_port "80" ; set $location_path "/" ; rewrite_by_lua_block { lua_ingress.rewrite( { force_ssl_redirect = false , ssl_redirect = true , force_no_ssl_redirect = false , use_port_in_redirects = false , }) -- balancer.log() monitor.call() plugins.run() } port_in_redirect off; set $balancer_ewma_score -1 ; set $proxy_upstream_name "test-myblog-80" ; set $proxy_host $proxy_upstream_name; set $pass_access_scheme $scheme; set $pass_server_port $server_port; set $best_http_host $http_host; set $pass_port $pass_server_port; set $proxy_alternative_upstream_name "" ; -- proxy_next_upstream_timeout 0 ; proxy_next_upstream_tries 3 ; proxy_pass http://upstream_balancer; proxy_redirect off; } } ...
访问 域名解析服务,将 myblog.test.com解析到ingress的地址上。ingress是支持多副本的,高可用的情况下,生产的配置是使用lb服务(内网F5设备,公网elb、slb、clb,解析到各ingress的机器,如何域名指向lb地址)
本机,添加如下hosts记录来演示效果。
1 192.168.100.2 myblog.test.com
然后,访问 http://myblog.test.com/
HTTPS访问:
1 2 3 4 5 $ openssl req -x509 -nodes -days 2920 -newkey rsa:2048 -keyout tls.key -out tls.crt -subj "/CN=*.test.com/O=ingress-nginx" $ kubectl -n test create secret tls tls-myblog --key tls.key --cert tls.crt
修改yaml
1 2 3 4 5 6 7 8 9 10 11 12 13 14 15 16 17 18 19 20 21 apiVersion: networking.k8s.io/v1 kind: Ingress metadata: name: myblog namespace: test spec: rules: - host: myblog.test.com http: paths: - path: / pathType: Prefix backend: service: name: myblog port: number: 80 tls: - hosts: - myblog.test.com secretName: tls-myblog
然后,访问 https://myblog.test.com/
常用注解说明 nginx端存在很多可配置的参数,通常这些参数在ingress的定义中被放在annotations中实现,如下为常用的一些:
1 2 3 4 5 6 7 8 9 10 11 12 13 14 15 16 17 18 19 20 21 22 23 24 25 26 apiVersion: networking.k8s.io/v1 kind: Ingress metadata: name: myblog namespace: test annotations: nginx.ingress.kubernetes.io/force-ssl-redirect: "false" nginx.ingress.kubernetes.io/proxy-body-size: 1000m nginx.ingress.kubernetes.io/ssl-redirect: "false" nginx.org/client-max-body-size: 1000m spec: rules: - host: myblog.test.com http: paths: - path: / pathType: Prefix backend: service: name: myblog port: number: 80 tls: - hosts: - myblog.test.com secretName: tls-myblog
nginx.ingress.kubernetes.io/force-ssl-redirect: “false”:是否强制重定向到https
nginx.ingress.kubernetes.io/proxy-body-size: 1000m:设置请求体的最大值
nginx.ingress.kubernetes.io/ssl-redirect: “false”:是否重定向到https
nginx.org/client-max-body-size: 1000m:设置请求体的最大值
nginx.ingress.kubernetes.io/proxy-buffering: “on”:是否开启缓冲区
nginx.ingress.kubernetes.io/proxy-buffer-size: 1000m:设置缓冲区大小
nginx.ingress.kubernetes.io/proxy-buffers-number: 1000m:设置缓冲区数量
nginx.ingress.kubernetes.io/proxy-connect-timeout: 1000m:设置连接超时时间
nginx.ingress.kubernetes.io/proxy-read-timeout: 1000m:设置读取超时时间
nginx.ingress.kubernetes.io/proxy-send-timeout: 1000m:设置发送超时时间
nginx.ingress.kubernetes.io/proxy-max-temp-file-size: 1000m:设置临时文件大小
nginx.ingress.kubernetes.io/proxy-request-buffering: “on”:是否开启请求缓冲区
nginx.ingress.kubernetes.io/rewrite-target: /$1:重写url
nginx.ingress.kubernetes.io/use-regex: “true”:是否使用正则表达式
多路径转发及重写的实现 多path转发示例 目标:
1 2 bookstore.test.com -> 192.168.100.3 -> /reviews -> reviews service /details -> details service
实现:
1 2 3 4 5 6 7 8 9 10 11 12 13 14 15 16 17 18 19 20 21 22 23 24 25 26 27 28 29 30 31 32 33 34 35 36 37 38 39 40 41 42 43 44 45 46 47 48 49 50 51 52 53 54 55 56 57 58 59 60 61 62 63 64 65 66 67 68 69 70 71 72 73 74 75 76 77 78 $ cat detail.dpl.yaml apiVersion: apps/v1 kind: Deployment metadata: name: details labels: app: details spec: replicas: 1 selector: matchLabels: app: details template: metadata: labels: app: details spec: containers: - name: details image: docker.io/istio/examples-bookinfo-details-v1:1.16.2 imagePullPolicy: IfNotPresent ports: - containerPort: 9080 $ cat detail.svc.yaml apiVersion: v1 kind: Service metadata: name: details labels: app: details spec: ports: - port: 9080 name: http selector: app: details apiVersion: apps/v1 kind: Deployment metadata: name: reviews labels: app: reviews spec: replicas: 1 selector: matchLabels: app: reviews template: metadata: labels: app: reviews spec: containers: - name: reviews image: docker.io/istio/examples-bookinfo-reviews-v3:1.16.2 imagePullPolicy: IfNotPresent env : - name: LOG_DIR value: "/tmp/logs" ports: - containerPort: 9080 $ cat reviews.svc.yaml apiVersion: v1 kind: Service metadata: name: reviews labels: app: reviews spec: ports: - port: 9080 name: http selector: app: reviews
准备Ingress文件
1 2 3 4 5 6 7 8 9 10 11 12 13 14 15 16 17 18 19 20 21 22 23 24 25 apiVersion: networking.k8s.io/v1 kind: Ingress metadata: name: bookstore namespace: default spec: rules: - host: bookstore.test.com http: paths: - path: /reviews pathType: Prefix backend: service: name: reviews port: number: 9080 - path: /details pathType: Prefix backend: service: name: details port: number: 9080
URL重写 目标:
1 2 bookstore.test.com -> 192.168.100.3 -> /api/reviews -> /reviews -> reviews service /details -> /details -> details service
实现:
1 2 3 4 5 6 7 8 9 10 11 12 13 14 15 16 17 18 19 20 21 22 23 24 25 26 27 28 29 30 31 32 33 34 35 36 37 38 39 $ cat bookstore.reviews.ingress.yamlapiVersion: networking.k8s.io/v1 kind: Ingress metadata: name: bookstore-reviews namespace: default annotations: nginx.ingress.kubernetes.io/rewrite-target : /reviews/$1 spec: rules: - host: bookstore.test.com http: paths: - path: /api/reviews/(.*) pathType: Prefix backend: service: name: reviews port: number: 9080 $ cat bookstore.details.ingress.yamlapiVersion: networking.k8s.io/v1 kind: Ingress metadata: name: bookstore-details namespace: default spec: rules: - host: bookstore.test.com http: paths: - path: /details pathType: Prefix backend: service: name: details port: number: 9080